Intro:
Hi Friends !! In this post I will
explain how to create Professional news letter using MS-Office. Its very simple.
I have attached Screenshots also. If you are not too well
versed with popular newsletter creating applications, you can still create a very
impressive newsletter with the help of MS Word 2007!!!
Step 1
Designing the Cover Header:
A
newsletter generally does not have a dedicated
cover. The purpose of a newsletter is to be very
direct and
to-the point. Hence, the first page contains a table of contents, the editorial
or the main
story. To create the identity of your
newsletter on the cover page, carry out the following steps:
- Go to the 'Insert' tab. Click the 'Cover Page' option from the 'Pages ' section.
- Select a cover design from the drop-down list. Here,we are using 'Stack'.
- Drag and place the table on the left of the page.
- Type newsletter name, issue date and other details. Play around with the font sizes as required.

Step 2
Styling the newsletter name:
Once
your header is ready, you need to start with
the first story headline. To do so, carry out the following
steps:
- Type a headline in alignment with your newsletter name.
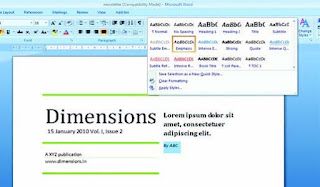
- Select headline text. Go to the 'Home' tab and click the 'Title' option from the 'Styles ' section.
- Alternatively you can also use 'Heading 1', 'Heading 2', 'Heading 3' or 'Heading 4' styles for your title.
- Put in the author's name for the story below the headline.
- Select the 'byline' text.Go to the 'Home' tab and click the 'Emphasis' option appearing under the 'Styles ' section of the tab.

Step 3
Adding a drop-cap to the first alphabet:
A
drop cap ensures that your readers know where
each of your stories begin. To do so, carry out the
- Finally type out the contents of your story.
- Go to the 'Insert' tab to apply a drop cap to the first alphabet of the story.
- Click the 'Drop Cap'option under the 'Text' group.
- Click the 'Dropped' option from the drop-down menu. If the alphabet shifts in alignment drag it to the appropriate position.
Step 4
Adding columns to paragraphs:
It
is always advisable to have multi column text
to enhance the readability of your story. A single
page can
have many blocks of multi-column text. To do so, carry out the following steps:
- Select the required text.
- Go to 'Page Layout' tab.
- Click the 'Columns' option appearing under the'Page Setup' group.
- Click 'More Columns' fromthe drop-down menu.
- Select 'Three' from the 'Preset' section.
- Set 'Spacing' value as '0.17cm'.
- Click 'OK' to continue.
Step 5
Creating story dividers:
- Go to the 'Insert ' tab.
- Click the 'Shapes' option appearing under the'Illustrations' group.
- Select the 'Line' option under the 'Lines' section of the drop-down list.
- Click the start and end points of the line while keeping the [Shift] keydown.
- To change the line properties, select the line.
- Click the 'Format' sub-tab under the new 'Drawing Tools' tab.
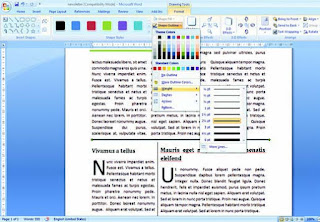
- Select the 'Shape Outline' option appearing under the 'Shape Styles' section.
- Select the 'Weight' option from the drop-down list.
- Select a value as per yourchoice from the pop-up list

Tip
Adding the newsletter logo to each page:
It
is a good practice to add a logo to the header of each page of your newsletter.
To create a master header or cover title,
[1] Go to the 'Insert' tab.
[2] Click the 'Header' option
under the 'Header & Footer' group.
[3] Select a header depending
on the themeof the newsletter from the drop-down list
[4] Type the newsletter's name
in the right side corner, and insert the logoon the left.
[5] Select a fill color to
match your document from the'Home' tab.
[6] If the logo stands
awkwardly, set the 'Text Wrap' value to 'Square'.
Step 6
Adding images:
Once
you have created your story, you need to make
it a bit livelier by adding images to it. To do so,
carry out
the following steps:
- Go to the 'Insert ' tab.
- Select the 'Picture' section appearing under the 'Illustrations' group of the tab.
- Browse and insert the picture. Place the image as per CHIP Plus TIP your requirement.
- Select the image. Click the 'Format' tab appearing under the 'Picture Tools' sub-tab.
- Select the 'Text Wrapping' appearing under the 'Arrange' group of the tab.
- Select the 'Square' option from the drop-down list. Your image will now appear cross columns.
- Select the 'Align' option appearing under the 'Arrange' group of the tab.
- Select the ' Align Center' option from the dropdown list.
- Make sure the ' Align to Margin' option is checked on.

Step 7
Adding image captions:
Once
you have added the images, they need captions
to explain their contents better. To add
captions
to your images, carry out the following steps:
- Select the image and go to the 'References' tab.
- Click the 'Insert Caption “option” under the 'Captions' group.
- Select the 'Label' value as 'Figure' and set the 'Position' as 'Below selected item'.
- Click 'OK'.
- Click the text box and start typing the text after'Figure #'.
Step 8
Adding text blurbs:
Text
blurbs or shout boxes are an excellent way to
highlight key quotes or important lines from
your
story. To add text blurbs, carry out the following steps:
- Copy the text to be blurbed and paste it next to the original test.
- Select the copied text.
- Go to the 'Insert' tab.
- Click the 'Text Box' option under the 'Text' group.
- Select a 'Draw Text Box' to create the base of the blurb.
- Type the text.
- Go to the 'Home' tab.
- Alter the font properties as per your requirements.
- Select the text box and click the 'Format' tab under the 'Text Box Tools' sub-tab.
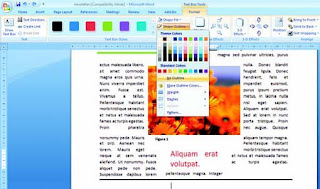
- Select 'Shape Outline'. Click the 'No Outline' option from the drop down menu.
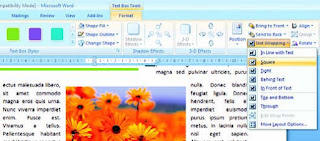
- Click the 'Square' option in the 'Text Wrapping 'drop-down list under the' Arrange' group.
- Select the 'Text Wrapping' option appearing under the 'Arrange' group of the tab.
- Select the 'Square' option from the drop-down list. The text will now flow around your blurb.


This comment has been removed by the author.
ReplyDeleteThanks for sharing such a detailed process on how to make the best newsletters. I needed this one. Try visiting this link to learn and read great content: https://twitter.com/edu_birdie?lang=en Give some thoughts too
ReplyDeleteloved the post. thanks.
ReplyDeleteHappy Independence Day Essay
I had a great time reading this kind of valuable post. Please keep sharing and enlightening your readers' minds. Visit my Lawrence Todd Maxwell pinterest page when you have some spare time.
ReplyDeleteYour content is excellent but with pics and videos,
ReplyDeletethis blog could certainly be one of the best in its field.
Excellent blog!
appvn
kissanime alternatives