Intro:
In this post I will explain how to setup Backup.
How to protect your system from accidental data loss. There are a number of factors
that can lead to data loss in hard drives. To prevent such a scenario, Paragon
Drive Backup helps you back up all your data and restores it easily when
required.
ABOUT PARAGON DRIVE BACKUP:
Data protection is a growing cause of worry for each and every
user. Data may be corrupted or lost due to several reasons like a virus attack
or an unauthorized person who gets access to a computer. In such cases having a
backup of your hard disk is essential. Paragon Drive Backup uses a reliable
method known as archive duplication' that can easily restore your data in case
of a system crash. This method takes a snapshot of the entire disk including
the structure of directories, fifer le allocation, attributes and other
important data. Thus it restores your system exactly the way it was in case of
data loss. Using this application, you can create a backup of your disk on a separate
disc as well as create a recover disk in case of a system failure which will
allow you to boot the system from DOS during a recovery attempt.
STEP 1
PARAGON Drive Backup is a free
application and can be downloaded from the website www.paragon-software.com Once the file has been downloaded, double-click it to start the
installation wizard.
- On the first screen of the installation wizard, click 'Next'.
- Select 'I accept the terms in the license agreement' and then click 'Next'.
- Click the 'Get free serial key' button. This will redirect you to Paragon' website.
- Enter appropriate details such as your name and e-mail address and click 'Submit'.
- Once you have received the serial key via e-mail, enter it in the respective field and click 'OK'.
- Click 'Next' and follow the steps to complete the installation process.
- Restart your system to use the application

STEP 2
CREATING AND RESTORING A BACKUP FILE
ONCE
installation has been completed, you are now
ready to create a backup, restore fifties or create a disc backup using the
simple wizards provided by Paragon drive backup.
- Run Paragon Drive Backup, click the 'Backup disk or partition' button and then 'Next'.
- Select an appropriate drive for backup.
- You can also back up the master boot record of the drive if required.
- Click 'Next' to proceed.10
- Select a location to save the archive file.
- Enter the file name in the 'Archive name' text box.
- Click 'Next' to proceed.
- Click 'More options'.
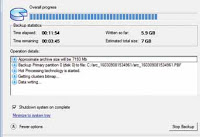
- Select the 'Shutdown system on complete' check box to shut down the computer once the process has been completed.
- You can cancel the backup process at any moment by clicking 'Stop Backup'.
- To check the integrity ofan archive, click the 'Check Archive Validity' button and then 'Next'.
- Make sure the, 'Show all' option is selected from the drop-down list.
- Select an archive file and click 'Next' to start the verification process.
- To restore a disk, click the 'Restore disk or partition' button on the main interface.
- Click the 'File View' link.
- Browse for the archived file.
- Select an archive file and Click 'Next' to start the restore process.


STEP 3
CREATING RECOVERY MEDIA
 PARAGON Drive Backup allows you to
create a Recovery Media Builder that will help you recover from data loss. Here
we will use a full ash drive as a bootable recovery media.
PARAGON Drive Backup allows you to
create a Recovery Media Builder that will help you recover from data loss. Here
we will use a full ash drive as a bootable recovery media.- Run Paragon Drive Backup and click 'Build Recovery Media'.
- Select 'Flash Memory' and click 'Next'. Select 'Typical'.
- Connect your USB flash drive and click 'Next'.
- The drives can be viewed on the next screen.
- Select it and click 'Next' to make your USB drive a recovery medium.

CREATING A RECOVERY CD/DVD:
At times your system may encounter problems due to which you may
be unable to boot up. At such times a recovery CD/DVD can come in handy. A
recovery disc contains boot fifi les copied from your system and can be
executed from a CD or DVD to start upyour system in case of hard drive boot
failure. To create a recovery CD or DVD, follow the
steps below:
[1] Run Paragon Backup Express. The 'Express Launcher' will appear.
[2] Click 'Build Recovery Media'.
[3] Click the 'CD/DVD' radio button and then 'Next'.
[4] On the next screen, select' Typical' and then click 'Next'. You
will be a bleto view your drive on the next screen.
[5] Click 'Next' to create the
recoverable CD.


Great blog! I really love how it’s easy on my eyes and the info are well written. I am wondering how I could be notified whenever a new post has been made. I have subscribed to your rss feed which really should do the trick! Have a nice day!
ReplyDeletedata doctors houston
thanks for info nya bos
ReplyDeletehttp://salsareload1.blogspot.com/
http://distributorpulsamurah1.blogspot.com/
http://mobilereload1.webs.com/